SSO With URS4
Authentication using URS 4 - Process Overview
Introduction
This page provides a detailed description of the steps used by an application to authenticate a user with URS 4 using the OAuth2 protocol. While it describes the general data flow and contents of the exchange, it does not provide explicit details of the format of the exchange.
The Authentication Process
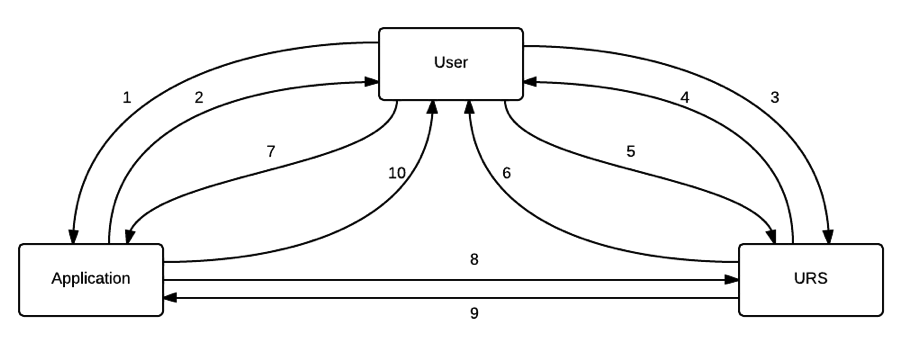
Authentication of a user with URS 4 is a multi-step process, with communication between your application, the user's web browser, and the URS authentication server. The diagram below shows the individual steps.
While the overall process may seem complicated, the individual steps are relatively simple, with the URS or the user’s web browser performing most of them. The steps are described in more detail below.
- User Initiate: The user starts up their web browser and enters your application URL (or selects it from a bookmark). The web browser submits a get request for corresponding web page (a get request is a regular request sent by web browsers to a web server for a web page. This is different from a post request that is used by a web browser to send data back to a web server).
- Authentication Redirect: The application server receives the request from the web browser. It determines that this particular user is not currently authenticated, and returns a redirection response back to the web browser. This response requests that the browser goes to another location - in this case, the URS 4 authentication page.
- Authentication Request: The user's web browser receives the redirection response from the application server, and submits a new get request to the location specified in the response - i.e. the URS authentication page.
- Authentication Challenge: The URS server receives the request and checks to see if the user is already logged in to the URS. Assuming this is not the case, the URS returns a login page as a response. This contains a form with username/password fields and a 'Log in' button.
- Challenge Submit: The user's web browser displays the login page to the user. The user enters their username and password, and clicks on the 'Log in' button. The web browser submits a post request, including the form data, back to the URS server.
- Challenge Response: URS receives the post request and form data, extracts the username/password and verifies it against its database. Assuming the username and password is correct, the URS server returns another redirection response back to the web browser. This redirection response is designed to send the user's web browser back to your application. However, the URS server also embeds a code into the redirection location that will be used by your application server (these are embedded as query parameters).
- Challenge Identity: The user's web browser receives the redirection response, and (without displaying anything to the user), issues a get request to the location specified in the redirection response - your application server.
- Token Request: Your application server receives this get request and, recognizing it as an authentication response from the URS, extracts query parameters from the URL. Using these parameters, it submits a post request via a secure socket back to a configured URS endpoint. This step is often referred to as the token exchange. This request will contain the code returned by the URS server (mentioned in step 6), as well as your application's registered name and password (hence the need for a secure socket).
- Token Response: The URS server receives the token exchange request, and verifies all the information sent with the request. If all of this information is correct, it returns a response over the same secure socket. This response includes an access token that may be used by the client to request user profile information, and a refresh token that can be used to request another access token when the first one expires. It also includes an endpoint (URL) that can be used to request user profile information if needed.
- User Accept: The application receives the response from the server indicating that the token exchange was successful. It extracts the access token (and the refresh token if desired), as well as the endpoint for retrieving user information. At this point, the application considers the user fully authenticated, and returns the appropriate application home page back to the user. Your application may store the token information in its own session, or it may discard it if it does not need user profile information, and manages its own session timeout/logout.
Variations/Alternate Scenarios
There can be some subtle variations in the authentication process described above. These differences will most likely occur in two different situations:
The user has already logged in to the URS.
In this case, the URS will not need to request the username and password from the user, so in step 4, instead of returning the form data, it will return the redirection response as described in step 6, and the process will continue at step 7.
The user has never before logged in to your application using URS.
In this case, prior to returning the redirection response as described in step 6 (including the case where the user has already logged in to the URS, as described in the alternate scenario above), the URS will request that the user grant permissions for the application to access their user profile. Once the user has responded the process will continue at step 7.
Additional Notes
The data flows in steps 8 and 9 must be performed securely, and should therefore be done over a secure socket (e.g. HTTPS). The other steps may be done over a secure socket, but it is not essential to the authentication process.